The English Kitchen ([syndicated profile] theenglishkitchen_feed) wrote2025-07-19 06:00 am

Air Fryer Egg & Cheese Toast with Crispy Breakfast Potatoes

Air Fryer Breakfast 


I am using my air fryer more and more these days, especially now that the hot summer days are upon us. Using an air fryer to cook in this sweltering weather is easy and helps to keep my kitchen cool.  That is always a real bonus!! 


Today (Friday as I write this) I cooked a complete Breakfast for Supper in it, including Crispy Air Fryer Breakfast Potatoes and Air Fryer Egg & Cheese Toast.  


I had been out shopping with my sister all afternoon and was really tired when I got in. By the time I got everything put away I was pooped and couldn't be asked to cook. I was also starving, however!!


A Breakfast for supper was in the cards. This made an ideal light meal for myself on a night when I really didn't want to put a lot of effort or time into cooking, yet still wanted something delicious and substantial. 


Air Fryer Egg Breakfast


Both were quick and easy to make in the air fryer, requiring minimal effort on my part. It probably took me longer to get everything ready to go than it did to cook the actual meal.  Once all my ingredients were prepped, however, things moved rather quickly.


I was really pleased with the way the potatoes came out. They were nicely crisped up with golden-brown edges. They also had bags of flavor with just the right amount of spice. 


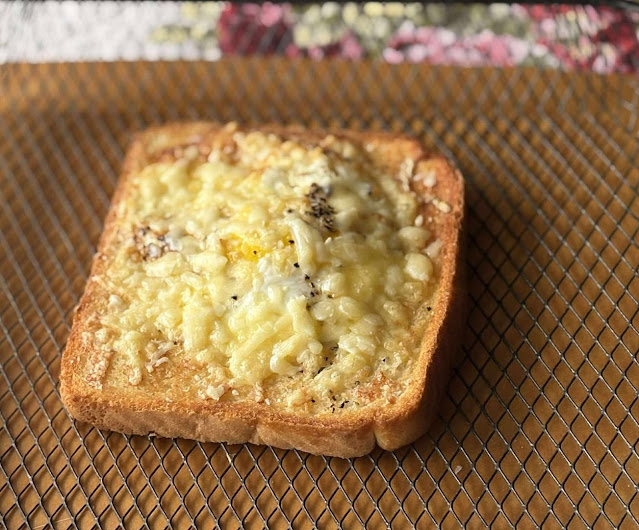
The Egg and Cheese Toast came out perfect as well. The bread was nicely toasted and crispy edged, with a beautiful buttery flavor. My egg was a bit more done than I wanted, but that was purely a matter of timing on my part. It still tasted excellent!  That smattering of cheese melted over the top was incredibly moreish and the perfect topper!  


This was so tasty and simple to make that I am still thinking about it several hours later.  This quick, easy, and delicious meal is now going to be a part of my regular rotation.  It made an excellent Breakfast for Supper Meal but would also make an excellent weekend breakfast for anyone! I highly recommend!


Air Fryer Breakfast Potatoes 


WHAT DO YOU NEED TO MAKE CRISPY AIR FRYER POTATOES
AND AIR FRYER EGG & CHEESE TOAST


There is nothing really complicated required to make this quick, easy and delicious breakfast! Simple ingredients put together in a delicious and easy way.


For the Breakfast Potatoes:
  • 4 medium sized potatoes, peeled and diced
  • 2 TBS light olive oil
  • 1 tsp your favorite seasoning (I used Kinders Caramelized Onion & Butter seasoning)
  • 1/2 tsp paprika or smoked paprika
  • 1/2 tsp salt
  • 1/4 tsp black pepper
For the Egg & Cheese Toast:
  • 2 slices of bread
  • softened butter to spread
  • 2 eggs
  • 1/2 cup (40g) grated cheddar cheese
  • salt and black pepper to taste
  • hot sauce to serve (optional)


Air Fryer Breakfast Potatoes 


I used ordinary white potatoes for this, which I peeled. You could use red skinned potatoes and leave the peels on if you wanted to. This would add more fiber to the dish.  


I used the Kinders Caramelized Onion and Butter seasoning. I really like the Kinders seasonings. If you don't have that you could use a combination of paprika, garlic powder, onion powder and anything else that you think you might enjoy on your potatoes.


I used regular paprika as I am not overly fond of the flavor or smell of smoked paprika. Either one will give your potatoes a nice color.


I used regular white bread, thick slice.  You could use a grainy or whole wheat bread if you would prefer.

My eggs were large eggs. I get them from a chicken farm up on the mountain. They are free range and organic.  They only cost $5.50 a dozen which is a really great price for free range and organic eggs.


I used a strong white cheddar cheese. (Sharp.)  Coastal Cheddar which I buy locally at Sobeys. You can also get huge blocks of it at Costco. It's got a beautiful flavor.


Air Fryer Breakfast Potatoes


HOW TO COOK THE CRISPY AIR FRYER POTATOES


  1. Prepare your potatoes. Peel and cut into 1/2 inch cubes.
  2. Toss together in a bowl with the seasonings and the oil. Pour into the air fryer basket.
  3. Air fry at 400*F/200*C for 15 to 20 minutes, stirring halfway through the cook time. Remove and keep warm.


Air Fryer Egg Toast 


HOW TO COOK THE AIR FRYER EGG & CHEESE TOAST


  1. While the potatoes are cooking prepare your egg. Lightly butter the slices of bread on both sides.
  2. Make a hollow dip in the center of each slice.
  3. Place into an air fryer tray or basket. Break an egg into the middle of each. Season to taste with salt and pepper. Divide the cheese between the two toasts and sprinkle it evenly over top.
  4. Air fry for 5 to 7 minutes, or until the desired doneness of your egg. (Mine is hard cooked at 7 minutes so if you want it runny cook it for less.) The bread should be crisp and golden brown and the cheese melted.


Air Fryer Egg Toast 


WHY AIR FRY?


The more I use my air fryer the more I like it and the more I get used to cooking food in it. The first air fryer I got, quite a number of years ago was quite bulky and took up a lot of space. It operated somewhat like a convection oven and had a paddle which stirred the food around in the air fryer space. Today's air fryers are much more compact. They take up a lot less space in the kitchen as well.

My pros for air frying are as follows:

  • They don't heat up the kitchen in the summer months.
  • They have the capacity to cook with a minimal amount of fat, and often much quicker than using a conventional oven, which makes the food a bit healthier.
  • They are much easier to clean than a conventional deep fat fryer and you don't have to worry about getting rid of or storing the oil used. 
  • They are much safer to use than a conventional deep fat fryer.
  • They are an excellent means for reheating crispy foods in less time than the oven with crisp rather than soggy results.
  • They are an ideal tool for the smaller family to use when cooking rather than turning on a whole oven, they can often do the same thing quicker and using less power.


Air Fryer Egg Toast 


A FEW OTHER THINGS 
YOU CAN COOK IN THE AIRFRYER FOR BREAKFAST 


CHEESE & ONION TOASTIESCheese and Onion are classic British flavors when it comes to sandwiches and snacks, and these air fryer toasted sandwiches highlight those flavors beautifully! Four simple ingredients are all that you need and eight minutes of time.  Toasted with ease in an air fryer.  Quick, easy and delicious!


PERFECT AIR FRYER BOILED EGGS (HARD OR SOFT)- Cooking your boiled eggs in the air fryer is actually a very easy and simple thing to do. It is all about timing, the size of your eggs, and the temperature of your eggs. Timings are included for soft to hard boiled eggs. Your choice.


Air Fryer Breakfast 


 Don't forget to Pin this recipe to your Breakfast Boards on Pinterest and remember to FOLLOW ME ON PINTERESTFACEBOOK or INSTAGRAM. 


That way, you can be assured that you are always up to date with my fresh content as soon as I post it. You can also sign up to receive a weekly newsletter from Grow. 


Yield: Serves 2
Author: Marie Rayner
Air Fryer Breakfast

Air Fryer Breakfast

This is a complete breakfast with crispy roasted breakfast potatoes and a delicious egg and cheese toast. Simple to make and really delicious! Multiply to serve as many people as you need to feed.

Ingredients

For the Breakfast Potatoes:
  • 4 medium sized potatoes, peeled and diced
  • 2 TBS light olive oil
  • 1 tsp your favorite seasoning (I used Kinders Caramelized Onion & Butter Seasoning)
  • 1/2 tsp paprika or smoked paprika
  • 1/2 tsp salt
  • 1/4 tsp black pepper
For the Egg & Cheese Toast:
  • 2 slices of bread
  • softened butter to spread
  • 2 eggs
  • 1/2 cup (40g) grated cheddar cheese
  • salt and black pepper to taste
  • hot sauce to serve (optional)

Instructions

  1. Prepare your potatoes. Peel and cut into 1/2 inch cubes.
  2. Toss together in a bowl with the seasonings and the oil. Pour into the air fryer basket.
  3. Air fry at 400*F/200*C for 15 to 20 minutes, stirring halfway through the cook time. Remove and keep warm.
  4. While the potatoes are cooking prepare your egg. Lightly butter the slices of bread on both sides.
  5. Make a hollow dip in the center of each slice.
  6. Place into an air fryer tray or basket. Break an egg into the middle of each. Season to taste with salt and pepper. Divide the cheese between the two toasts and sprinkle it evenly over top.
  7. Air fry for 5 to 7 minutes, or until the desired doneness of your egg. (Mine is hard cooked at 7 minutes so if you want it runny cook it for less.) The bread should be crisp and golden brown and the cheese melted.
  8. Divide the potatoes and the cheesy egg toasts between two heated plates and pass the hot sauce!
Did you make this recipe?
Tag @marierayner5530 on instagram and hashtag it #TheEnglishKitchen


Air Fryer Breakfast


This content, written and photography, is the sole property of The English Kitchen. Any reposting or misuse is not permitted. If you are reading this elsewhere, please know that it is stolen content and you may report it to me at mariealicejoan at aol dot com.


Thanks for visiting! Do come again!! 


 If you like what you see here, why not consider signing up for my newsletter and/or subscribing to/following me on Grow? You can also bookmark my recipes via the Grow platform. Check out the heart on the right-hand side of the screen.
IKEA Hackers ([syndicated profile] ikeahacker_feed) wrote2025-07-18 12:00 pm

IKEA Just Made an Extension Cord You’ll Actually Want to Display

Posted by Jules Yap

We know, we know—extension cords aren’t exactly the sexiest item in your home. But what if we told you IKEA made one that’s sleek, smart, and dare we say… decor-worthy? Enter the IKEA SKOTAT extension cord, a refreshingly design-forward take on the everyday power strip. It’s the kind of thing that blends in so beautifully, you’ll forget it’s even there—until you need it to charge your laptop, phone, tablet, or all three at once. Let’s plug in and unpack why […]

The post IKEA Just Made an Extension Cord You’ll Actually Want to Display appeared first on IKEA Hackers.

The English Kitchen ([syndicated profile] theenglishkitchen_feed) wrote2025-07-18 06:00 am

Chicken Diablo - A Weeknight Supper with Simple & Delicious Flavors


Chicken Diablo


I grew up in a home where you could always tell what day of the week it was by what was on the dinner table at the end of the day. My mother tended to cook the same things from one week to week to the next and tended to cook the same things with very little variation.  Chicken was always a rare and occasional treat.


We loved it when mom would make her "Maryland Fried Chicken."  Chicken breasts rolled in egg, milk, flour and cracker crumbs and then fried in butter. Oh boy, but that was some good!! It was not something we got to enjoy near often enough! The thought of it still makes my tastebuds tingle!


Chicken is something I eat quite frequently these days. Not only is it a bit more affordable than most other meats, but it is also very adaptable and quite good for you, being high in protein and low in fat. I do like to vary the way I cook it, however, so that it never becomes boring.


This recipe for Chicken Diablo which I am sharing with you today is one that I adapted from a cookbook I have called, "Recipes Worth Sharing."  It is a compilation of favorite recipes from Community Cookbooks.  I love Community Cookbooks. They are full of the "Tried and True" recipes of families everywhere. Everyone contributes only their best to these books.


Chicken Diablo 


I actually switched out the original recipe quite a bit today.  I didn't want to put my oven on and so switched things out to cook the chicken in a skillet on top of the stove. I used less honey than the original as I am a diabetic and I thought a half cup of honey was a bit much. I did add some orange juice to make up the difference which added a different kind of sweet and a bit of natural tang.


Because I was cooking it on top of the stove in a skillet, I also opted to dredge the chicken pieces in some flour and brown them a bit before pouring the sauce over to simmer. This also helped to thicken the sauce a bit.


This ended up being fabulously tasty, with a bit of warmth from the Djon mustard and the curry powder which is used. Not too much, just enough.  There was just the right amount of sweetness as well. I have included in my recipe notes below how to cook it in the oven, just in case you want to try that.


If you want to, you can omit the orange juice and increase the honey to 1/2 cup (180g) but trust me when I say that the smaller amount was just right.  The sauce was slightly sweet, a bit tangy and just a bit spicy.  Perfect with that moist and tender chicken.


Chicken Diablo 


WHAT YOU NEED TO MAKE CHICKEN DIABLO


A few simple ingredients, that's all. You might even have everything you need to make this delicious dish in your house right now!


For the sauce:
  • 1/4 cup (60g) butter, melted
  • 1/4 cup (90g) honey
  • 1/4 cup (63g) Dijon mustard
  • 1/2 cup (120ml) fruit juice (apple, orange, etc.)
  • 1 tsp curry powder
  • 1/2 tsp salt

For the chicken:
  • 3 boneless, skinless chicken breasts, cut in half through the middle to make 6 cutlets
  • salt, pepper, garlic powder to taste
  • flour to dust (about 3 TBS)
  • 1 TBS light olive oil


Chicken Diablo


My chicken breasts were about the size of an open hand., probably about 6 ounces in weight each. Cut in half I thought that each one was plenty enough for two people, but then I am an older person and don't have quite the appetite that a younger person would have.


I used regular salted butter, local Nova Scotia liquid honey and French Dijon mustard.  (You get a mellow heat without any acidity.) I used Orange juice as that is what I had. It gave a lovely flavor to the sauce. My curry powder was of medium strength.


Chicken Diablo 


HOW TO COOK CHICKEN DIABLO


This is a really simple way to cook chicken that results in tender and juicy chicken with a lush and flavor-filled sauce. Perfect with rice and a vegetable on the side!


  1. Whisk all of the ingredients for the sauce together until smooth and amalgamated. Set aside.
  2. Prepare your chicken. Dust it all over on both sides with salt, pepper and garlic powder (NOT salt) and then dredge lightly with flour shaking off any excess.
  3. Heat the oil in a large skillet. Once hot add the chicken breasts, presentation side down.
  4. Cook until browned and then flip over and brown the other side. (about 4 to 5 minutes per side.)
  5. Pour the sauce over top and around the chicken. Cover tightly and cook over medium low heat for about 25 minutes, turning the chicken occasionally, until the chicken has cooked through, is golden brown and glazed, and the sauce has thickened to your desired consistency. (You can always remove the chicken and increase the heat on the sauce to thicken it if you need to.)
  6. You will know it is done when the inside temperature of the chicken is 165*F/74*C and the juices run clear.
  7. Serve warm with some of the sauce spooned over top.
  8. I like to serve this with rice and a vegetable.

You could of course cook this in the oven rather than in a skillet as in the original recipe. To do so:

  Place the chicken breasts in a casserole. (uncooked) Pour the sauce over top, cover and cook at 350*F/ 180*C for 45 minutes. Uncover and bake for 15 minutes longer, or until the chicken is tender and brown, basting it with the pan juices.


Chicken Diablo 


HINTS AND TIPS FOR CHOOSING AND COOKING CHICKEN


ALWAYS MAKE SURE IT IS FRESH:
Choose chicken that has a clean smell, firm texture, and is pink in color. Fresh chicken is typically more flavorful


ALWAYS CHOOSE THE RIGHT CUT FOR YOUR PURPOSES: 
 Chicken Breasts: Lean and versatile, ideal for grilling, baking, or sautéing
Chicken Thighs: Juicier and flavorful, great for roasting or braising
Chicken Wings: Perfect for appetizers or snacks, often fried or baked


 MARINATE FOR TENDERNESS AND FLAVOR: 
Use a flavorful marinade with acidic ingredients like lemon juice or vinegar to tenderize the meat and enhance flavor


HOW TO COOK: 
 Roasting: Preheat your oven to 425°F (220°C) and roast for about 1 hour and 15 minutes until the internal temperature reaches 165°F (75°C)2. 
Grilling: Marinate for at least 30 minutes using your favorite marinade, then grill until the chicken is cooked through


TOP TIP: Always let the chicken rest for 10-15 minutes after cooking to allow the juices to redistribute, resulting in a juicier meal


Chicken Diablo 


HERE ARE A FEW MORE WAYS TO COOK CHICKEN
THAT MIGHT COME IN HELPFUL


HOW TO POACH CHICKENPoaching is one way of cooking chicken that always results in moist and delicious chicken meat, ready to enjoy just as is or for use in other dishes.  It's also very easy and simple to do.


HOW TO COOK CHICKEN IN THE MICROWAVEOne of the easiest ways to cook chicken to use in other recipes is in the microwave. If you know how to cook chicken in the microwave you will never be short of cooked shredded chicken. It is very simple to do and very quick. The chicken always comes out moist and delicious. Perfect for shredding or dicing. 


Chicken Diablo  


Don't forget to Pin this recipe to your Main Dish or Chicken Boards on Pinterest and remember to FOLLOW ME ON PINTEREST, FACEBOOK or INSTAGRAM. 


That way, you can be assured that you are always up to date with my fresh content as soon as I post it. You can also sign up to receive a weekly newsletter from Grow. 


Yield: 4 - 6 servings
Author: Marie Rayner
Skillet Chicken Diablo

Skillet Chicken Diablo

Prep time: 10 MinCook time: 35 MinTotal time: 45 Min

Tender and juicy pieces of chicken breast in a lush sweet and spicy sauce. Easily done in a skillet. I use my electric fry pan.

Ingredients

For the sauce:
  • 1/4 cup (60g) butter, melted
  • 1/4 cup (90g) honey
  • 1/4 cup (63g) Dijon mustard
  • 1/2 cup (120ml) fruit juice (apple, orange, etc.)
  • 1 tsp curry powder
  • 1/2 tsp salt
For the chicken:
  • 3 boneless, skinless chicken breasts, cut in half through the middle to make 6 cutlets
  • salt, pepper, garlic powder to taste
  • flour to dust (about 3 TBS)
  • 1 TBS light olive oil

Instructions

  1. Whisk all of the ingredients for the sauce together until smooth and amalgamated. Set aside.
  2. Prepare your chicken. Dust it all over on both sides with salt, pepper and garlic powder (NOT salt) and then dredge lightly with flour shaking off any excess.
  3. Heat the oil in a large skillet. Once hot add the chicken breasts, presentation side down.
  4. Cook until browned and then flip over and brown the other side. (about 4 to 5 minutes per side.)
  5. Pour the sauce over top and around the chicken. Cover tightly and cook over medium low heat for about 25 minutes, turning the chicken occasionally, until the chicken has cooked through, is golden brown and glazed, and the sauce has thickened to your desired consistency. (You can always remove the chicken and increase the heat on the sauce to thicken it if you need to.)
  6. You will know it is done when the inside temperature of the chicken is 165*F/74*C and the juices run clear.
  7. Serve warm with some of the sauce spooned over top.
  8. I like to serve this with rice and a vegetable.
Did you make this recipe?
Tag @marierayner5530 on instagram and hashtag it #TheEnglishKitchen


Chicken Diablo


This content, written and photography, is the sole property of The English Kitchen. Any reposting or misuse is not permitted. If you are reading this elsewhere, please know that it is stolen content and you may report it to me at mariealicejoan at aol dot com.


Thanks for visiting! Do come again!! 


 If you like what you see here, why not consider signing up for my newsletter and/or subscribing to/following me on Grow? You can also bookmark my recipes via the Grow platform. Check out the heart on the right-hand side of the screen.
IKEA Hackers ([syndicated profile] ikeahacker_feed) wrote2025-07-17 12:00 pm

Make Chic Scalloped Shelves in 5 Minutes Flat (So Easy!)

Posted by Stacy Randall

Simple, inexpensive, and fast. These are three things that make a DIY project extremely tempting. Oh, and I’ll add a fourth — it looks good, too! These cute bookshelves from Sarah Klingenberg @sarahs_scandi_home are just right for a child’s room or nursery. The front-facing covers create a boutique bookstore vibe. Plus, it’s a great way for kids to identify books easily, and it transforms book storage into wall art. We did something similar in my son’s room when he was […]

The post Make Chic Scalloped Shelves in 5 Minutes Flat (So Easy!) appeared first on IKEA Hackers.

The English Kitchen ([syndicated profile] theenglishkitchen_feed) wrote2025-07-17 06:00 am

Butter Rum Muffin Recipe – Quick, Easy, And Delicious


Butter Rum Muffins


When I was a child one of the candies I loved most was Lifesavers. There was something really magical about that hard candy with the hole in the middle. You could stick your fingers in the holes and pretend they were odd shaped fingernails, string them up yarn for a necklace, etc. My favorite flavor as a child was Butter Rum.  


I don't know why, really. It was just the flavor that I enjoyed most.  All buttery, sweet, and almost caramel-like. I did not know what rum tasted like, so I had no comparison.  I just knew that I loved that flavor combination.  I still do. I also love Rum & Raisin Ice Cream when I can get it.


It has been many, many years since I have seen Lifesavers, although I am sure they are still around. When I saw this Butter Rum Muffin Recipe, it immediately made me think of those candies and I knew I had to bake them!


Butter Rum Muffins 


I added a sugar/butter topping to the finished muffins. A bit of a buttery sugar crust.  Just to the tops of them.  Its quite optional but very easily done. Simply brush the tops of the warm baked muffins with melted butter and dip into sugar.  Very nice. I promise.


These bake up as lovely muffins with a beautiful moist texture. The flavor of the butter combined with the rum is rich and delicious. The aroma of them baking will make your house smell all warm and cozy.


Quick and easy to make, and oh-so-tasty! I will be baking these again!!


Butter Rum Muffins 


WHAT YOU NEED TO MAKE BUTTER RUM MUFFINS


All of the usual suspects with the exception of a bit of rum. If you don't have any rum, simply add 1/4 cup of water to which you have added some rum extract. Not quite as good as the real thing, but the muffins will still be delicious. True confessions here, I used Brandy as Brandy is what I had in the cupboard, and I added 1 tsp of rum extract along with 1 tsp of vanilla.


For the muffins:
  • 2 cups (250g) all-purpose plain flour
  • 1 cup (192g) granulated sugar (in the U.K. use castor sugar)
  • 1 TBS (11g) baking powder (this is correct)
  • 1/4 tsp salt
  • 1/2 cup (115g) butter, melted
  • 2 large eggs
  • 1 cup (240ml) milk
  • 1/4 cup (60ml) dark rum
  • 2 tsp vanilla
For the topping:
  • 1/4 cup (57g) butter, melted
  • 1/4 cup (48g) granulated sugar


I used salted butter and whole milk as that is all I keep in my house.  Farm fresh eggs. I make my own vanilla extract. It's very nice.


I think these would be lovely with some plumped up raisins added. Simply soak them for about 10 or 15 minutes in some hot water or rum. About 1/2 cup/75g of raisins (before plumping) will do. 


Butter Rum Muffins 


HOW TO MAKE BUTTER RUM MUFFINS


These go together in much the same way as any muffin.  The sugar coating on top is optional, but very nice. 


  • Preheat the oven to 375*F/190*C/ gas mark 5. Butter a 12-cup muffin tin (medium muffins) really well, or line with baking papers.
  • Whisk the flour, sugar, baking powder and salt together in a large bowl until well combined.
  • Whisk the eggs, milk, rum, vanilla extract and melted butter together in a beaker.
  • Make a well in the center of the dry ingredients. Pour in the wet. Stir together just to combine. Do not overmix. There should be no dry streaks, but the batter will be lumpy. That is quite all right.


Butter Rum Muffins 


  • Spoon into the prepared muffin tin, filling the cups about 3/4 full. (I do it until they are about 1/4 inch from the tops of the muffin cups.)
  • Bake in the preheated oven for 18 to 20 minutes, until well risen and a toothpick inserted in the center of one comes out clean. If not, bake for a few more minutes.
  • Leave to cool in the tin for five minutes before removing to a wire rack.
  • For the optional sugar topping: As soon as you can handle them brush the tops only of each one with some of the melted butter and roll them lightly in the granulated sugar.
  • Serve warm or at room temperature.


Butter Rum Muffins 


HINTS & TIPS FOR PERFECT MUFFINS


Here are my hints and tips for making sure that your muffins turn out beautifully every time:

1. Mix wet and dry ingredients separately. To prevent the mix from being overworked, first mix the wet ingredients together in one bowl and mix the dry ingredients in another. Make a well in the dry ingredients, carefully pour in the wet ingredients, then stir the mix a couple of times to roughly combine. 

 2. Don't over mix your muffins. The most important rule of muffin making is to not over stir the mix. What you really want is to just moisten the ingredients. Do not stir or beat the batter until it is smooth and lump free. You want the final mix to be lumpy, and thick with a few floury streaks.

 3. Add your flavors last.  While spices should be added with all the other dry ingredients, additions like fruit and nuts should be added last. Give the batter one more light-handed stir once you've added them in just to combine.  

4. Line the pans. You can choose to either grease the muffin tin or line it with paper liners. If you choose to forgo the liners, make sure you grease the base and sides of the cups with oil spray or a little melted butter. If you're not going to eat the muffins for a while, do use paper liners as these will keep the muffins fresher for longer. 

 5. Don't overfill your pans. Aim to fill the cups ¾ full to get muffins with nice round tops and to prevent them from spilling out over the top of the cups.  Often if your tins are over filled the muffins will rise to the top and then collapse on themselves.

 6. For extra interest, add a flavorful sprinkle on top.  Once the muffin cups are all filled, you can choose to sprinkle the tops with more fruit, nuts or a crumble topping, even sanding sugar or cinnamon sugar, for even more taste and or crunch. As the muffins rise these toppings will cook into the tops of the muffin.  

7. Protect your baking pan.  If there isn't enough batter to fill all the cups, half fill the empty ones with water. This will help the muffins bake evenly and will help to protect your pan from buckling. 

8. Cooling them down. Once you remove the muffins from the oven, let them sit in their pan for a few minutes before removing to a wire rack. This is especially important for muffins that aren't in a paper liner, as it will help them from falling apart. However, remove them after five minutes otherwise you risk them going soggy as they cool in the pan. 

9. Freeze extras for later. Muffins freeze beautifully, so if you can't enjoy them all on the day they're baked, wrap them in plastic wrap  tightly,  and put them in the freezer for later. They will keep for about 3 months and reheat wonderfully in the microwave for about 30 seconds on high from frozen. 


Butter Rum Muffins 


OTHER MUFFIN RECIPES FOR YOU TO ENJOY


SPECIAL K BREAKAST MUFFINSThese are the PERFECT breakfast muffins. Quick and easy to make. Delicious. I highly recommend. Simple and filled with fiber. You can use ordinary Special K cereal, or you can be a bit more extravagant and use one of the varieties which contain fruit.  This recipe makes half a dozen fabulous muffins. 


SIX WEEK REFRIGERATOR BRAN MUFFINSThere is nothing like having a great muffin batter in the refrigerator, mixed and ready to bake. This is an adaptation of a very old recipe and has been pleasing women and their families for many years. This was the muffin recipe that I had to bake for my female employer every day that I worked at the Manor. She liked them baked in mini muffin tins and would eat three of them every single morning.  They are delicious. 


Butter Rum Muffins  


Pin This Recipe to Your Muffin, Teatime, or Breakfast Boards on Pinterest and Remember to FOLLOW ME ON PINTEREST,    FACEBOOK, or INSTAGRAM


That way, you can be assured that you are always up to date with my fresh content as soon as I post it. You can also sign up to receive a weekly newsletter from Grow. 


Yield: 12 delicious muffins
Author: Marie Rayner
Butter Rum Muffins

Butter Rum Muffins

Prep time: 10 MinCook time: 20 MinTotal time: 30 Min

These are fabulous muffins. Soft and light, they have a beautiful flavor. The butter sugar topping is optional, but I will tell you it is very nice! Have all of your ingredients at room temperature before beginning.

Ingredients

For the muffins
  • 2 cups (250g) all-purpose plain flour
  • 1 cup (192g) granulated sugar (in the U.K. use castor sugar)
  • 1 TBS (11g) baking powder (this is correct)
  • 1/4 tsp salt
  • 1/2 cup (115g) butter, melted
  • 2 large eggs
  • 1 cup (240ml) milk
  • 1/4 cup (60ml) dark rum
  • 2 tsp vanilla
For the topping:
  • 1/4 cup (57g) butter, melted
  • 1/4 cup (48g) granulated sugar

Instructions

  1. Preheat the oven to 375*F/190*C/ gas mark 5. Butter a 12-cup muffin tin (medium muffins) really well, or line with baking papers.
  2. Whisk the flour, sugar, baking powder and salt together in a large bowl until well combined.
  3. Whisk the eggs, milk, rum, vanilla extract and melted butter together in a beaker.
  4. Make a well in the center of the dry ingredients. Pour in the wet. Stir together just to combine. Do not overmix. There should be no dry streaks, but the batter will be lumpy. That is quite all right.
  5. Spoon into the prepared muffin tin, filling the cups about 3/4 full. (I do it until they are about 1/4 inch from the tops of the muffin cups.)
  6. Bake in the preheated oven for 18 to 20 minutes, until well risen and a toothpick inserted in the center of one comes out clean. If not, bake for a few more minutes.
  7. Leave to cool in the tin for five minutes before removing to a wire rack.
  8. For the optional sugar topping: As soon as you can handle them brush the tops only of each one with some of the melted butter and roll them lightly in the granulated sugar.
  9. Serve warm or at room temperature.
Did you make this recipe?
Tag @marierayner5530 on instagram and hashtag it #TheEnglishKitchen


Butter Rum Muffins


This content, written and photography, is the sole property of The English Kitchen. Any reposting or misuse is not permitted. If you are reading this elsewhere, please know that it is stolen content and you may report it to me at mariealicejoan at aol dot com.


Thanks for visiting! Do come again!! 


 If you like what you see here, why not consider signing up for my newsletter and/or subscribing to/following me on Grow? You can also bookmark my recipes via the Grow platform. Check out the heart on the right-hand side of the screen.
IKEA Hackers ([syndicated profile] ikeahacker_feed) wrote2025-07-16 12:45 pm

The Day IKEA Assembled Its First Hot Dog—and Changed Snack Time Forever

Posted by Jules Yap

Mark your calendars because July 16 is National Hot Dog Day. It’s the perfect day to indulge in our favorite treat, and what better way to celebrate than with a delicious IKEA hot dog or veggie dog? How Did National Hot Dog Day Start? National Hot Dog Day was established to celebrate the humble hot dog, a staple of American cuisine enjoyed at ballparks, backyard barbecues, and street vendors for generations. This day is simply about savoring that perfect bite […]

The post The Day IKEA Assembled Its First Hot Dog—and Changed Snack Time Forever appeared first on IKEA Hackers.

IKEA Hackers ([syndicated profile] ikeahacker_feed) wrote2025-07-16 12:00 pm

IKEA in a Georgian Townhouse? This DIYer Pulled It Off Flawlessly

Posted by Stacy Randall

IKEA might not be the first thing that comes to mind when you think “Georgian townhouse,” but Sophie Murphy (@thelistedtownhouse) is here to prove that flat-pack can live beautifully alongside period features. In her elegant dining room, Sophie transformed 3 BILLY bookcases into built-ins that look like they’ve always belonged. The goal? Create a cozy, functional space with extra storage, without blowing the budget. Sophie said, “Sometimes you’ve just got to do things that are both affordable, within reach, but […]

The post IKEA in a Georgian Townhouse? This DIYer Pulled It Off Flawlessly appeared first on IKEA Hackers.

The English Kitchen ([syndicated profile] theenglishkitchen_feed) wrote2025-07-16 06:00 am

How To Make Naked Chicken Tenders – Lean & Delicious Protein


Naked Chicken Tenders


I used to work as a personal Chef for an American Family on a Manor Estate in the U.K. I worked for them for about ten years or so. It was a job that I really enjoyed.  One of the perks was that I had my own country cottage to live in that was situated on a corner of the Estate.


I cooked three meals a day for the family, as well as ladies' luncheons, dinner parties, etc. Normally, unless they were entertaining, I would not cook at the weekend. I did have to make sure that I left enough food pre-cooked in the refrigerator for them to be able to rustle up a meal for themselves over the weekend.


One of the things I always made was a plate of Naked Chicken Tenders.  Chicken tenders, simply seasoned and cooked in a skillet with very little fat.  Ready to add to salads, or sandwiches, to use as a part of a main meal or to enjoy as a snack with a dip or spread.


Naked Chicken Tenders 


They loved them.  In fact, I used to make a plate full of them earlier in the week as well as the Mrs. loved to have them for snacking on.  Chicken tenders, marinated in some seasonings and a tiny bit of oil, then pan fried quickly to perfection.


They do need to marinate in the seasoning mix for about half an hour at the very least, but once marinated they cook up in about 12 minutes tops, depending on their size. Obviously larger ones will take a bit longer.


You can also do chicken breast strips this way if you wish, but the chicken tenders come out much more tender and juicy and have less tendency to dry out if you over-cook them. If you follow my timings however, they will be cooked perfectly. I promise you!


Quick, easy, delicious and no fuss, no muss, chicken tender perfection.


Naked Chicken Tenders 


WHAT YOU NEED 
TO MAKE NAKED CHICKEN TENDERS


Five simple ingredients. That's all. No more. No less. Quick, easy, delicious!


  • 1 pound of chicken tenders, trimmed (see photo below as well as the written instructions)
  • 1 TBS light olive oil, or your favorite cooking oil
  • 2 TBS Ranch seasoning mix
  • 1/4 tsp ground pepper
  • 1/4 tsp ground Chipotle pepper or chili powder


Naked Chicken Tenders  


You can use whatever kind of oil you prefer in the marinade. I like to use light olive oil for all of my marinades and cooking. It has all the same properties as extra virgin olive oil, but is not as intense a flavor so it will not mess with the integrity of any dish you use it in.


Make your own Ranch Seasoning: Whisk together 1/2 cup dry buttermilk powder (available online), 1 TBS dried parsley, 2 tsp dried dillweed, 1 tsp freeze dried chives, 1 TBS garlic powder, 1 TBS onion powder, 1 tsp fine sea salt, 1/2 tsp ground black pepper.  Store in an airtight container in the refrigerator. This will keep for up to 2 months. Use as is for a seasoning mix, or whisk together 1/4 cup of this dry seasoning with 1 cup (220g) of mayonnaise, 1/2 cup (60g) of sour cream and 1/2 cup (120ml) of milk to make ranch dressing. You can also use it to season other things like popcorn, stir a bit into a baked potato to make stuffed baked potatoes, etc.


How to cook naked chicken tenders 


HOW TO COOK NAKED CHICKEN TENDERS


These are very easy and quick to cook. The longest part of the recipe is the marinating time. Obviously the longer you marinate them the more flavor they will have, but you can marinate them for as little as 30 minutes if you are in a hurry.


  1. Trim all of your chicken tenders by removing the tendon and discarding it. Put them into a container.
  2. Whisk together the oil, pepper, seasoning mix and chipotle/chili powder. Pour this over the chicken tenders and stir everything well together until the chicken tenders are all coated.
  3. Put the chicken tenders into the refrigerator to marinate, for at least half an hour. The longer you marinate them, the more flavor they will have.
  4. Heat a large nonstick skillet (with a cover) over medium high heat. You can spritz it with a bit of cooking spray if need be.


Naked Chicken Tenders 


  1. Remove the chicken tenders from the refrigerator and add to the hot pan, in a single layer. Leave, without touching, for four minutes. Flip over and cook for a further 2 minutes, again, without touching.
  2. Cover with a lid and turn off the burner. Leave to stand for 6 minutes.
  3. They should now be perfectly cooked and seasoned. You can check the inner temperature. It should read 165*F/74*C. The juices should run clear.
  4. Serve as is with salad, or rice, potatoes, pasta or as a snack with your favorite dip.
  5. Store any leftovers in a tightly covered container in the refrigerator. (Eat within 3 to 4 days maximum)


Naked Chicken Tenders 


HOW TO TRIM CHICKEN TENDERS


Chicken tenders are one of those things that are really delicious and easy to cook and use. They do have a tough tendon running through them however.  I always ALWAYS remove this as it can make them tough. Removing it is very easy.


  • Place the tender, top side up, on a cutting board, with the pointy end facing you. Using a piece of paper towel, firmly grasp the white end of the tendon between your pincher fingers.
  • Using a sharp knife at a 30 degree angle, trap the tendon between your knife and the cutting board. 
  • Slowly, holding the tendon firmly, wiggle the knife back and forth to reveal more of the tendon, and get a better grip on it. 
  • Once you have a solid grip on the first inch or so of the tendon, you should be able to hold it firmly and slide the angled knife against the board to cut the tendon out without damaging the meat.
  • You can also watch a video on how to do it here on YouTube. She uses a fork and a piece of paper towel.


Naked Chicken Tenders 


SOME OTHER QUICK CHICKEN TENDER RECIPES WHICH
YOU MAY ALSO ENJOY


FIERY CHICKEN TENDERS WITH BLUE CHEESE DIPThese tasty buffalo tenders get their flavor from a buttermilk soak, using buttermilk lightly flavored with hot sauce. Rolled in a seasoned flour and lightly pan-fried to perfection. Served with a lush homemade blue cheese dip.


CHICKEN TENDER NACHOS - Low Carb, Low GI and diabetic friendly. Perfectly seasoned chicken tenders are given the nacho treatment. These are loaded with Tex Mex flavors. From the spicy coating mix, to the cheese, to the crunchy mix of toppings you choose to load them up with!


Naked Chicken Tenders 


Pin This Recipe to Your Dinner Boards on Pinterest and Remember to FOLLOW ME ON PINTEREST,    FACEBOOK, or INSTAGRAM


That way, you can be assured that you are always up to date with my fresh content as soon as I post it. You can also sign up to receive a weekly newsletter from Grow. 


Yield: 4 servings
Author: Marie Rayner
Naked Chicken Tenders

Naked Chicken Tenders

Prep time: 35 MinCook time: 12 MinTotal time: 47 Min

Tender and juicy, these cook quickly and end up perfect every single time.

Ingredients

  • 1 pound of chicken tenders, trimmed (see photo above)
  • 1 TBS light olive oil, or your favorite cooking oil
  • 2 TBS Ranch seasoning mix
  • 1/4 tsp ground pepper
  • 1/4 tsp ground Chipotle pepper or chili powder

Instructions

  1. Trim all of your chicken tenders by removing the tendon and discarding it. Put them into a container.
  2. Whisk together the oil, pepper, seasoning mix and chipotle/chili powder. Pour this over the chicken tenders and stir everything well together until the chicken tenders are all coated.
  3. Put the chicken tenders into the refrigerator to marinate, for at least half an hour. The longer you marinate them, the more flavor they will have.
  4. Heat a large nonstick skillet (with a cover) over medium high heat. You can spritz it with a bit of cooking spray if need be.
  5. Remove the chicken tenders from the refrigerator and add to the hot pan, in a single layer. Leave, without touching, for four minutes. Flip over and cook for a further 2 minutes, again, without touching.
  6. Cover with a lid and turn off the burner. Leave to stand for 6 minutes.
  7. They should now be perfectly cooked and seasoned. You can check the inner temperature. It should read 165*F/74*C. The juices should run clear.
  8. Serve as is with salad, or rice, potatoes, pasta or as a snack with your favorite dip.
  9. Store any leftovers in a tightly covered container in the refrigerator.

Notes

You can use any seasoning you like with these. Any of the Kinder seasonings work well. Dry rubs work well also. Use your favorite seasonings to taste and you are sure to have something really delicious!

Did you make this recipe?
Tag @marierayner5530 on instagram and hashtag it #TheEnglishKitchen

Naked Chicken Tenders


This content, written and photography, is the sole property of The English Kitchen. Any reposting or misuse is not permitted. If you are reading this elsewhere, please know that it is stolen content and you may report it to me at mariealicejoan at aol dot com.


Thanks for visiting! Do come again!! 


 If you like what you see here, why not consider signing up for my newsletter and/or subscribing to/following me on Grow? You can also bookmark my recipes via the Grow platform. Check out the heart on the right-hand side of the screen.


IKEA Hackers ([syndicated profile] ikeahacker_feed) wrote2025-07-15 12:00 pm

39 IKEA KALLAX Hacks So Good, You’ll Want to Add One To Every Room

Posted by Stacy Randall

The IKEA KALLAX may look like a simple cube shelf, but in the hands of creative DIYers, it becomes everything from a luxe entryway bench to a sleek home bar or even a hidden litter box. Since replacing the EXPEDIT in 2014, the KALLAX has quietly earned cult status as one of IKEA’s most hackable pieces—and for good reason. Whether you’re a seasoned maker or a weekend DIY dabbler, these IKEA KALLAX hacks prove that you don’t need a workshop […]

The post 39 IKEA KALLAX Hacks So Good, You’ll Want to Add One To Every Room appeared first on IKEA Hackers.

The English Kitchen ([syndicated profile] theenglishkitchen_feed) wrote2025-07-15 06:00 am

Denver Omelet – An Easy Classic with Ham & Veggies


Denver Omelet 


Nothing says “diner breakfast” like a fluffy Denver Omelet loaded with savory ham (or bacon), colorful bell peppers, sharp cheddar, and some gently sautéed onions. It’s simple, hearty, and satisfies that craving for something warm, cheesy, and protein rich. 


When I lived in Southern Ontario there was a local place that we always used to go to for breakfast whenever my in-laws were visiting.  A favorite choice was the omelet. You could get them made to order and filled with whatever you wanted. My late father-in-law really enjoyed these.


Denver Omelet 


This Denver omelet is classically delicious whether you choose to enjoy this for breakfast or for supper. As a person who lives on their own, I will often enjoy eggs for supper.  They are quick to prepare and loaded with protein and nutrition.


Cooking for two or craving a solo brunch moment, this small batch recipe delivers classic flavor with minimal fuss - - just whisk, sauté, and fold!


On this day, I enjoyed my omelet with some cheeky Tater tots and hot buttered toast on the side. I was stuffed to the eyeballs before I even got halfway through, which suggests that it would make the perfect light supper for two light eaters or a hearty supper for one!


Denver Omelet 


WHAT YOU NEED TO MAKE A DENVER OMELET


Simple everyday ingredients and quite adaptable to what you have. Vegetables and protein suggested are only suggestions but are what is most commonly used.


For the omelet:
  • 2 large eggs
  • 1 TBS water
  • 1/8 tsp salt
  • pinch black pepper
  • 1 TBS butter
To fill:
  • 2 TBS butter
  • 1 cup (75g) sliced fresh mushrooms
  • 1/2 medium red pepper, chopped
  • 1/2 medium yellow pepper, chopped
  • 1/2 medium green pepper, chopped
  • 1/2 small onion, chopped (can use spring onion, I used a red onion as that is what I had)
  • 1/2 cup (85g) diced cooked ham or cooked bacon
  • salt and pepper to taste (remember cheese, ham and bacon are all salty ingredients)
  • 1/2 cup (42g) grated good cheddar cheese


Denver Omelet 


We buy our eggs at Peltons, which is up on the mountain here in the Valley. They are always fresh and delicious and are free range.  They are also excellently priced at only $5.50 a dozen. I have never had a problem with any of them.


True confessions here, I used a little tub of already chopped peppers, mushrooms, onions, etc. that I purchased at the grocery store. As a single person it makes sense for me to do this as it is much cheaper than buying all of the ingredients separately. I get them at Sobey's, and they are called vegetables for Pizza or Omelets. The pot contains just the right amount of everything.


I keep already cooked bacon in my freezer. I tend to buy it when it is on sale and then cook the whole lot, popping it into a zip lock baggie, ready to use as and when I need it. I just take out what I need and then chop or whatever as required for any recipe.


Also, if I need cooked ham for things I tend to buy the small ham steaks which I will cut into a small dice. Works perfectly.


I used Coastal Cheddar cheese, which I bought at Sobey's but it is also available by the big block at Costco. It is a rich and rugged mature cheddar from the Dorset coast of England.  It has a lovely flavor and salt crystals that are a natural development of the cheese making process. It's gorgeous.


Denver Omelet 


HOW TO MAKE A DENVER OMELET


This is a really simple omelet to make and always comes out tasty.  Hearty and filling as well!


  1. Prepare all of your vegetables and then cook. (Cut them all into uniform bite sized pieces.)
  2. Melt the 2 TBS butter in a large skillet. Once it begins to foam add the mushrooms, peppers, and onions.
  3. Cook, stirring frequently, over medium heat, until the vegetables have softened nicely. Add the cooked ham or bacon. Stir to heat through. Keep warm.


Denver Omelet 


  1. Whisk the eggs, water, salt and black pepper together.
  2. Melt the TBS of butter in an 8 or 10-inch skillet over medium heat until it begins to foam.
  3. Tip in the egg mixture, tilting the pan to cover the bottom completely. Leave to cook without disturbing for 5 to 6 minutes. After that time, you can run a spatula around the edges and tilt the pan to let any uncooked egg run underneath.
  4. Sprinkle the cheddar cheese overall. Let melt.
  5. Spoon the vegetable and meat mixture over half of the omelet and tip the other half over top to cover.
  6. Serve immediately.


Denver Omelet 


SOME OTHER EGG DISHES THAT YOU MIGHT ALSO ENJOY


Here are a few other egg dishes that you may also enjoy cooking and eating.  The poached eggs come in particularly handy.


OVEN POACHED EGGS - This is the best way to poach eggs when you are needing to poach them for a large number of people. You can do as many or as few as you wish. They all end up being cooked at the same time and they always come out perfect. No fuss, no muss poached eggs. 


SCOTTISH FARMHOUSE EGGSSimple ingredients put together in the simplest of ways with enticingly delicious and elegant results.  Fresh farmhouse eggs. Fresh soft white breadcrumbs. A good cheddar cheese. Finely minced spring onions, cream/milk.  It doesn't get much simpler than this.


Denver Omelet 


HOW TO CHOOSE AND USE EGGS


Great tasting egg dishes depend on good quality eggs. My sister and I buy our eggs at a reputable farm up on the mountain.  They are always very fresh. To ensure your eggs are always in top condition, follow the following shopping, storing and serving guidelines.


  • Purchase clean and fresh eggs, either from the chiller cabinet in the shops or from a reputable egg producer.
  • Refrigerate the eggs promptly as soon as you bring them home from wherever you bought them, with the large ends facing upwards.
  • For best quality use within a week. You can however safely store them for up to five weeks.
  • Discard any eggs with broken or cracked shells. They may have been contaminated with salmonella or e-coli.
  • Serve hot egg dishes right away.
  • Refrigerate chilled egg dishes right after mixing and keep them chilled until serving time.
  • Chill leftovers or make-ahead dishes containing eggs promptly.


IMPORTANT NOTE - It is the opinion of experts that uncooked eggs or slightly cooked eggs in recipes such as mayonnaise, meringues or Caesar salad may be harmful to some people because of possible salmonella contamination. The same is true of over-easy eggs, sunny-side up, or soft boiled eggs. If you are elderly, ill, or otherwise at risk it is advised that you avoid those dishes.


Denver Omelet 


Pin This Recipe to Your Dinner Boards on Pinterest and Remember to FOLLOW ME ON PINTEREST,    FACEBOOK, or INSTAGRAM


That way, you can be assured that you are always up to date with my fresh content as soon as I post it. You can also sign up to receive a weekly newsletter from Grow. 


Yield: two servings
Author: Marie Rayner
Denver Omelet

Denver Omelet

Prep time: 10 MinCook time: 10 MinTotal time: 20 Min

A simple and delicious omelet filled with cheese, veggies, and bacon or ham. This makes a great mid-week supper. Enjoy with your favorite potatoes and some hot buttered toast.

Ingredients

For the omelet:
  • 2 large eggs
  • 1 TBS water
  • 1/8 tsp salt
  • pinch black pepper
  • 1 TBS butter
To fill:
  • 2 TBS butter
  • 1 cup (75g) sliced fresh mushrooms
  • 1/2 medium red pepper, chopped
  • 1/2 medium yellow pepper, chopped
  • 1/2 medium green pepper, chopped
  • 1/2 small onion, chopped (can use spring onion, I used a red onion as that is what I had)
  • 1/2 cup (85g) diced cooked ham or cooked bacon
  • salt and pepper to taste (remember cheese, ham and bacon are all salty ingredients)
  • 1/2 cup (42g) grated good cheddar cheese

Instructions

  1. Prepare all of your vegetables and then cook. (Cut them all into uniform bite sized pieces.)
  2. Melt the 2 TBS butter in a large skillet. Once it begins to foam add the mushrooms, peppers, and onions.
  3. Cook, stirring frequently, over medium heat, until the vegetables have softened nicely. Add the cooked ham or bacon. Stir to heat through. Keep warm.
  4. Whisk the eggs, water, salt and black pepper together.
  5. Melt the TBS of butter in an 8 or 10-inch skillet over medium heat until it begins to foam.
  6. Tip in the egg mixture, tilting the pan to cover the bottom completely. Leave to cook without disturbing for 5 to 6 minutes. After that time you can run a spatula around the edges, and tilt the pan to let any uncooked egg run underneath.
  7. Sprinkle the cheddar cheese overall. Let melt.
  8. Spoon the vegetable and meat mixture over half of the omelet and tip the other half over top to cover.
  9. Serve immediately.
Did you make this recipe?
Tag @marierayner5530 on instagram and hashtag it #TheEnglishKitchen


Denver Omelet


This content, written and photography, is the sole property of The English Kitchen. Any reposting or misuse is not permitted. If you are reading this elsewhere, please know that it is stolen content and you may report it to me at mariealicejoan at aol dot com.


Thanks for visiting! Do come again!! 


 If you like what you see here, why not consider signing up for my newsletter and/or subscribing to/following me on Grow? You can also bookmark my recipes via the Grow platform. Check out the heart on the right-hand side of the screen.
IKEA Hackers ([syndicated profile] ikeahacker_feed) wrote2025-07-14 12:00 pm

3D Printed IKEA Hacks That Actually Make Sense

Posted by Jules Yap

If you’ve ever wished your IKEA furniture could work just a little harder for you, grab your nearest 3D printer or borrow one from a friend. IKEA fan and maker Adivor has created not one, but three helpful 3D printed IKEA hacks that solve everyday annoyances with a dose of smart design. We’re talking about: Hack #1: LACK Table Underside Organizer Problem solved: The IKEA LACK side table is simple and stylish, but offers no built-in storage. Adivor’s printable hack […]

The post 3D Printed IKEA Hacks That Actually Make Sense appeared first on IKEA Hackers.

The English Kitchen ([syndicated profile] theenglishkitchen_feed) wrote2025-07-14 06:00 am

How To Make Diner Style Meatloaf – A Weeknight Favorite


Diner Style Meat Loaf


Back in the 90's my husband and I used to enjoy travelling to the States on daytrips to go shopping. We enjoyed going down there to buy groceries as they were a lot cheaper than they were at home. With five growing children, every penny mattered.


We would always treat ourselves to a nice dinner at one of the local diner's while we were there. It was always a real treat.  Diner food is always the best.  Simple food but done really well.  At least that was always my experience.  Mom and Pop kind of food.


With varied menus and daily specials, usually handwritten on blackboards or paper place mats, placed strategically around the room for perfect viewing. You could always tell a good diner because it would be full and very busy.  Another good sign was a line of transport trucks in the parking lot. Truck Drivers always know the best places to eat.


Another thing we enjoyed about then was that they were usually not overly expensive places to eat. The food was not really fancy, but it was always really good.  It has been many years now since I have been to eat in a diner.


Diner Style Meat Loaf


Meatloaf has always been a big diner specialty.  Hearty, delicious and filling.  This meatloaf recipe  I am sharing with you today Is all that and more. I have been making it this way for years. I can't remember where I got the original recipe from, but it is very like the meatloaf you would be served in a diner style of restaurant. (I suspect I adapted it from the Fannie Farmer Cookbook but can't be sure.)


Meals like this are very homey and comforting as well as being delicious. They used to be considered thrifty, but with today's economy and the price of beef that is not true any longer, although, to be sure, ground beef IS a more economical way to enjoy beef!


This is a small batch recipe making a small (8 by 4-inch) loaf, which is ideal for two people. It cuts into four thick slices. You can enjoy it on the day and then enjoy a delicious Meatloaf Sandwich the day after!


Diner Style Meat Loaf 


WHAT YOU NEED TO MAKE DINER STYLE MEATLOAF


Except for the hot pickled peppers, which are entirely optional, you need only simple basic ingredients to make this tasty loaf!


For the Meatloaf:
  • 1 cup (60g) of freshly made breadcrumbs
  • 1 small onion, peeled and cut into chunks
  • 1 medium egg, beaten
  • 1 pounds extra lean ground beef (I use ground steak)
  • 2 TBS hot pickled pepper strips (optional)
  • 1 TBS Worcestershire Sauce
  • 3/4 tsp dry mustard powder
  • 3/4 tsp salt
  • 1/4 tsp freshly ground black pepper
  • 1/3 cup (80ml whole milk
  • 1/2 cup (60g) grated cheddar cheese
For the glaze:
  • 1/4 cup (65g) of tomato ketchup
  • 1/4 tsp dry mustard powder
  • 1 TBS soft light brown sugar, packed
  • 1/2 TBS liquid from the hot peppers jar


Diner Style Meat Loaf 


You can use any kind of bread to make the crumbs. I make them in a food processor. You don't want to use dry crumbs as they will absorb too much of any liquid used and make for a dry meatloaf.


You can also add grated vegetables with the breadcrumbs if you wish, such as carrot or zucchini. These will also add some moisture. I would not include them in the blitzing puree that you make with the onion, egg, milk and spices.  They should be kept separate if using.


Use a good cheddar that you enjoy. You want to taste it so a sharp cheddar is recommended.


The hot peppers are totally optional. They don't add a lot of heat to the mix, but they do add a chef's kiss of something different that people won't quite be able to put their finger on.  


Diner Style Meat Loaf 


HOW TO MAKE DINER STYLE MEAT LOAF


Make sure you also check out my secret tips at the end to ensure that your meatloaf will be the best ever!

  1. Place the onion, pickled peppers, egg, Worcestershire sauce, dry mustard powder, salt, pepper and milk into a blender. Blitz until smooth.
  2. Preheat the oven to 180*C/350*F/ gas mark 4. Have ready a large shallow roasting tin. Line a small loaf tin with plastic cling film.
  3. Place the meat, breadcrumbs and cheese into a large bowl. Mix lightly together.
  4. Pour the mixture from the blender over top. Mix this into the meat and breadcrumbs lightly with your hands, until well combined.
  5. Pack lightly into the lined loaf tin, smoothing over the top.


Diner Style Meat Loaf 


  1. Tip the meat mixture out of the tin and into the middle of the roasting tin, removing the loaf tin and discarding plastic cling film.
  2. Bake for 30 to 35 minutes.
  3. Whisk together the glaze ingredients until well mixed. Remove the meatloaf from the oven and brush this mixture overall.
  4. Return to the oven and bake for a further 10 to 15 minutes. Remove from the oven and allow to stand for 10 minutes before cutting into slices to serve.


Creamy Mashed Potatoes, Scalloped Potatoes, (any kind of potatoes really) and a mix of vegetables work  well at the side of this delicious dish! I confess we enjoy mashed potatoes most of all!


If desired, you can leave off the glaze and make a simple gravy to serve with the meatloaf in its place. Also, delicious!


Diner Style Meat Loaf 


SIX SECRETS TO A BETTER MEATLOAF


If you take on board my hints and tips you may never experience another dry and lackluster meatloaf again!  Trust me!


  • Use the right cut of meat. I like to use ground steak or ground sirloin. The leaner your meat mixture the less shrinkage you will get. Nobody enjoys a really greasy meatloaf.
  • Milk, onion and breadcrumbs help to give your loaf substance, and to keep it moist. Not only do the onions bring flavor, but the addition of milk and breadcrumbs allows for a much better texture, helping to stabilize the meat mixture as well as distributing the moisture evenly amongst the meat.
  • Salt and pepper is important but other flavors also add to the enjoyment of this old familiar dish. Mustard, ketchup, hot peppers, Worcestershire sauce and cheese all add flavor.
  • Use a light touch when mixing your meatloaf together.  Too much mixing and compacting will give your loaf a mushy, pasty texture and can also toughen it.
  • A glaze, whilst not necessary, always gives a nice look and finish to the loaf. Nobody will be reaching for the ketchup bottle if you do this right.
  • Let the meatloaf rest for about 10 minutes before slicing. This allows for any juices to be reabsorbed into the loaf.


Diner Style Meat Loaf 


OTHER WAYS TO ENJOY MEATLOAF


Here are a few other ways I enjoy making meatloaf. I promise you, they are also delicious!


STUFFED MEAT LOAFThis version of meatloaf is a bit different than the usual meatloaf.  For this recipe, you season your meat and pat it out to a rectangle. An onion stuffing mix and cheese are spread over top of that. The whole thing is then rolled up like a jelly roll and baked.  When it is almost done a glaze and grated cheese are added to the top. This is a moist and delicious loaf that slices well for sandwiches the day after.  


MACARONI & CHEESE MEATLOAF CASSEROLEFirst of all you have a wonderfully moist and tasty meatloaf base, glazed with a BBQ glaze.  This gets baked and then topped off with a lush macaroni and cheese.  The two then get baked together until all of those wonderful flavors meld together beautifully! This is extremely delicious to say the least!


Diner Style Meat Loaf 


Pin This Recipe to Your Dinner Boards on Pinterest and Remember to FOLLOW ME ON PINTEREST,    FACEBOOK, or INSTAGRAM


That way, you can be assured that you are always up to date with my fresh content as soon as I post it. You can also sign up to receive a weekly newsletter from Grow. 


Yield: 4 servings
Author: Marie Rayner
Diner Style Meatloaf

Diner Style Meatloaf

Prep time: 10 MinCook time: 50 MinInactive time: 10 MinTotal time: 1 H & 10 M

Baked in a free form style, this lovely meatloaf has a wonderful crust and flavor. If I am feeling particularly indulgent, I will lay strips of steaky bacon across the top, which is very nice, but it's delicious without it as well.

Ingredients

For the Meatloaf:
  • 1 cup (60g) of freshly made breadcrumbs
  • 1 small onion, peeled and cut into chunks
  • 1 medium egg, beaten
  • 1 pounds extra lean ground beef (I use ground steak)
  • 2 TBS hot pickled pepper strips (optional)
  • 1 TBS Worcestershire Sauce
  • 3/4 tsp dry mustard powder
  • 3/4 tsp salt
  • 1/4 tsp freshly ground black pepper
  • 1/3 cup (80ml whole milk
  • 1/2 cup (60g) grated cheddar cheese
For the glaze:
  • 1/4 cup (65g) of tomato ketchup
  • 1/4 tsp dry mustard powder
  • 1 TBS soft light brown sugar, packed
  • 1/2 TBS liquid from the hot peppers jar

Instructions

For the glaze:
  1. Place the onion, pickled peppers, egg, Worcestershire sauce, dry mustard powder, salt, pepper and milk into a blender. Blitz until smooth.
  2. Preheat the oven to 180*C/350*F/ gas mark 4. Have ready a large shallow roasting tin. Line a small loaf tin with plastic cling film.
  3. Place the meat, breadcrumbs and cheese into a large bowl. Mix lightly together.
  4. Pour the mixture from the blender over top. Mix this into the meat and breadcrumbs lightly with your hands, until well combined.
  5. Pack lightly into the lined loaf tin, smoothing over the top.
  6. Tip the meat mixture into the middle of the roasting tin, removing the loaf tin and discarding plastic cling film.
  7. Bake for 30 to 35 minutes.
  8. Whisk together the glaze ingredients until well mixed. Remove the meatloaf from the oven and brush this mixture overall.
  9. Return to the oven and bake for a further 10 to 15 minutes. Remove from the oven and allow to stand for 10 minutes before cutting into slices to serve.
Did you make this recipe?
Tag @marierayner5530 on instagram and hashtag it #TheEnglishKitchen


Diner Style Meat Loaf


This content, written and photography, is the sole property of The English Kitchen. Any reposting or misuse is not permitted. If you are reading this elsewhere, please know that it is stolen content and you may report it to me at mariealicejoan at aol dot com.


Thanks for visiting! Do come again!! 


 If you like what you see here, why not consider signing up for my newsletter and/or subscribing to/following me on Grow? You can also bookmark my recipes via the Grow platform. Check out the heart on the right-hand side of the screen.
The English Kitchen ([syndicated profile] theenglishkitchen_feed) wrote2025-07-13 06:00 am

Meals of the Week, July 6th - 12h, 2025

Meals of the Week, July 6th - 12h, 2025


Happy Sunday and welcome to my weekly, Meals of the Week post. On Sundays I like to share with my readers all of the main meals that I have enjoyed eating over the past seven days, along with any pertinent recipes and menu suggestions. I really like doing this and by all counts you like reading about them and seeing the food also. If you're happy I'm happy.  Its as simple as that.


These are only my main meals, and this does not include my breakfast meals or my supper meals. I say supper because normally I will eat my main meal around the middle of the day, or early afternoon. Unless I am eating with other people and then I will eat my meal whenever it is that they want to eat.


I find now that I am older my digestive system works best this way, without having to go to bed with a heavy meal on my stomach.  When I was a much younger woman it was quite common that we would make a pizza for a snack in the evenings or a box of Kraft Mac & Cheese. I can't do that anymore!


I usually have a simple breakfast. I will often make myself a protein shake and nurse it all morning, then have my main meal about one-ish.  Then later in the day I will enjoy something light, usually between five and six.  Perhaps a sandwich, or a salad.  Maybe a bowl of cereal or even some fruit.


Yes, occasionally if I have leftover pizza I will have that for my breakfast. When I do that however, I often find that I am full for most of the day, so I try not to do that on a regular basis.


For my main meals I try to choose things that are simple and yet delicious. I like, in the main, to do my own cooking.  I don't really like frozen meals or take aways.  I usually have Sunday dinner with my family every Sunday, either here or at my sister's. Usually it is at her place.


This week was highly unusual in that I actually ate out three times.  My sister's birthday was on Sunday and so my father took us all out for supper, and then on Monday my friend Jacquie wanted me to go out to lunch with her and then on Saturday my son, who has been visiting, wanted to take me out to lunch.  I have provided "like-recipes" for all of those meals so that you can cook what I ate if you so wish.


I try to always keep my cooking fairly healthy and within budget, but I am only human and do splurge every now and then and eat something naughty. My weakness is cake. 


And so without waffling on any further here are my meals of the week for the past seven days. I do hope you enjoy seeing them and that you will be inspired to want to cook some of them for yourself! 


Beer Battered Fish & Chips


SUNDAY, July 6th - Cindy's Birthday


Sunday was my sister's birthday and so my father took us all out to fish and chips.  We just went to a local spot, Angies. My family loves Fish and Chips. Usually when we go out for a meal that is what we will choose. It's always been the same.  What can I say?? My sister went out again on Wednesday and has fish and chips again. We are all alike! It runs in our blood.


In its place I am sharing my recipe for Beer Battered Fish. This is lovely.  The batter is nice and light. It is deep fried which I know is not to everyone's taste, but it is really delicious. Crisp batter, well flavored, tender and perfectly cooked fish.


Turkey Club Platter


MONDAY, July 7th - Lunch out with my friend Jacquie


My friend Jacquie called me on Monday morning and asked me to go out to lunch with her. This is not something I do very often, and I did not want to say no as she has asked me so many times and I have usually not been able to say yes. We went to the same place as I had gone Sunday night and so this time I thought I would shake things up an order something different.  I ordered a Club Sandwich. In its place I am sharing my recipe for a Turkey Club Platter.  


It really good. a lovely, toasted club sandwich with sliced turkey, ham, cheese, bacon and tomato, with a side of coleslaw and chips. Hearty, filling and delicious!


I did enjoy my lunch out with Jacquie and have vowed to do it more often.


Chopped Green Salad


TUESDAY, July 8th - Grilled Chicken and a Chopped Green Salad


After all of the indulgences so far this week I decided to play it safe on Tuesday and had some grilled chicken and a chopped green salad. This is one of my favorite salads. It has plenty of crisp lettuce, sliced cucumbers, sliced olives, green onions, chives, celery and peas. It also boasts a lovely Lemon and Herb Vinaigrette dressing. I love this salad.   


The grilled chicken was Marinated Mediterranean Chicken. I cook it on my little Cuisinart Griddler machine. This chicken always turns out tender and juicy.  I often cook it for company.


Chicken Pot Pie


WEDNESDAY, July 9th - Dinner with my son's family


My son and his family arrived for summer Camp. They go to an Ashram camp which is not too far from where I live. It did not start until Thursday so they spent the day with me on Wednesday. It was such a fun day. I played games with my grandsons and got to visit with my son and daughter-in-law. Just wonderful.


For supper I served Chicken Pot Pie, which I made from the extra chicken I cooked on Tuesday.  We had chips and salad with it.  One of my grandsons had a hotdog instead. For dessert we had ice cream.


The best part was sharing it all with family!


Reuben Fold-overs


THURSDAY, July 10th - Reuben Fold-Overs


I had a really busy day cleaning up from the visit and so I just made something simple for my supper on Thursday. Reuben Fold-Overs.  This is a quick and simple sandwich bake.  Flat breads folder over you favorite Reuben sandwich fillings.  Smoked meat, cheese, sauerkraut and Thousand Island Dressing.  Tucked ino a folden flat bread which is brushed with butter and then baked until everything is heated through and golden.  So delicious.


I enjoyed this sandwich with a few cheeky potato chips. I was beat and did not have a lot of energy. I think I am getting old, lol.


Bread and Cheese Omelet


FRIDAY, July 11th - Bread and Cheese Omelet


I just had a simple supper on Friday. I was out shopping with my sister all afternoon and pretty beat by the time I got home, but I was also starving. You cannot beat a tasty omelet for a quick and easy supper. I had just picked up some farm fresh eggs from the egg place on the mountain as well.


This Bread and Cheese Omelet is one of my favorites. You cube some bread and get it all toasty and golden brown, make your omelet and then stuff it with a good cheddar, some chopped spring onions and the toasted bread cubes.  No need for toast.  A salad on the side would go very nicely.


Chicken Biryani


SATURDAY,  July 12th - Lunch out with my son


My son wanted to take me out to lunch on Saturday to make up for Mother's Day and my upcoming Birthday. Who was I to refuse! We went to the new Indian place in Kingston called ChrisMaria.  I love the food there.


My son doesn't know a lot about Indian Food. We had Butter Chicken and Chicken Biryani and some samosas.  Chicken Biryani is a lovely chicken dish with tender pieces of chicken in a lovely rich with some raisins, flaked almonds (or cashews), spiced with cinnamon, cardamom, onions, bay leaf, etc. Its delicious. I have linked to my recipe for it. 


Of course the best part of this meal was sharing it with my son. Love him so much.


And there you have it! My meals of the week for the past seven days. Not conventional I know as I did eat out three times, which is most unusual!  I hope you will be inspired to want to cook at least a few of the things I have shared! 


This content, written and photography, is the sole property of The English Kitchen. Any reposting or misuse is not permitted. If you are reading this elsewhere, please know that it is stolen content and you may report it to me at mariealicejoan at aol dot com.


Thanks for visiting! Do come again!! 


 If you like what you see here, why not consider signing up for my newsletter and/or subscribing to/following me on Grow? You can also bookmark my recipes via the Grow platform. Check out the heart on the right-hand side of the screen.
The English Kitchen ([syndicated profile] theenglishkitchen_feed) wrote2025-07-12 06:00 am

Zesty Lemon Coconut Bars – The Best Slice for Summer

Coconut Lemon Slice


 I always like to have a cake in the house at the weekend. This is a tradition of my own making that goes back a very long way to when I was bringing up my own family.


During the week I would often bake them cookies. I liked to have fresh baked cookies waiting for them when they got home from school and would often include them in their packed lunches.  Yes, I WAS a baking mom. 


I had the luxury of being a stay-at-home mom, and being able to bake special treats for my children was one of my love languages. My own mother had worked so it we didn't really get home baked treats, with the exception of the holidays.


I was determined that my own children would have everything made from scratch. On weekdays, cookies and at the weekends, always a delicious cake, slice/bar, or sometimes a pie.


Old habits die hard.


Coconut Lemon Slice 


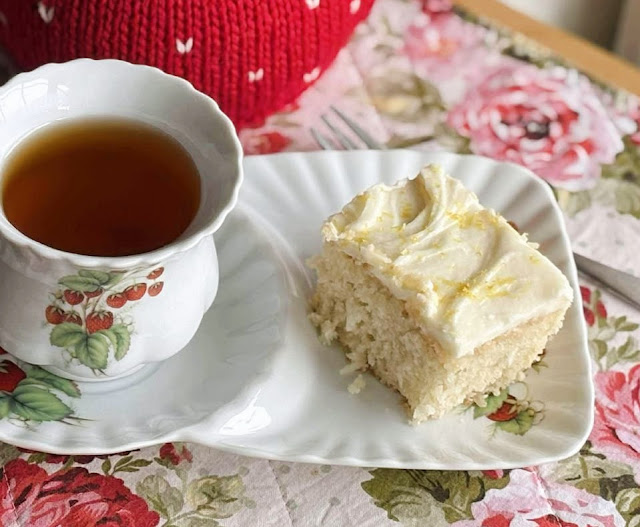
For this weekend I baked a lush and easy Coconut Lemon Slice, which is just a fancy name for a snack cake.  It is an 8-inch square coconut cake, moist and delicious.  Topped with a creamy rich lemon buttercream frosting, and fine grated lemon zest.


It cuts easily into 12 slices.  Just make four cuts along one way, and three across the other.  You will have the perfect sized slices to serve.


Fabulous as a teatime treat or as a dessert. It's all up to you. Quick and easy to make, rich, and very delicious!


Coconut Lemon Slice 


WHAT YOU NEED TO MAKE THIS EASY COCONUT LEMON SLICE 


This tasty bake requires very simple baking cupboard essentials.  Other than the fresh lemon, you probably have everything you need in the house right now!


For the cake:
  • 1 1/3 cups (150g) self-rising flour (see notes)
  • 1 1/2 cups (100g) shredded unsweetened coconut
  • 1/2 cup (115g) butter, melted
  • 3/4 cup (150g) sugar (in the U.K. use castor)
  • 2 large eggs, lightly beaten
  • 1/2 cup (120ml) whole milk
  • pinch salt
  • 2 tsp vanilla extract
For the lemon buttercream:
  • 1 1/2 cups (190g) sifted icing sugar
  • 1/3 cup (70g) butter, at room temperature
  • 2 to 3 TBS of fresh lemon juice
  • finely grated lemon zest to decorate

Coconut Lemon Slice 


Don't worry if you do not have any self-rising flour. You can very easily make your own and I tell you how to do that in the recipe notes.  It is very easily done. I usually make it up in 4 cup amounts and then I have it on hand for all sorts of bakes which require self-rising flour.  If you don't use this ingredient very often, you can also freeze it in an airtight container, and it will keep longer.


I used salted butter, and organic granulated sugar. Our granulated sugar here in Canada is a lot finer than granulated sugar in the U.K. In the U.K. you do need to use castor sugar.  If your sugar is too coarse, you can also blitz it in a food processor for a few turns to make it finer.


Icing sugar is also known as powdered sugar or confectioners' sugar.


I grate my lemon zest using a micro-plane grater. You get a nicer, fine result doing it this way. It depends on the finish you would like to see. You may prefer strands rather than a fine grating. It's your choice.


I used flaked coconut, but you could also use desiccated coconut. Make sure it is unsweetened unless you want a really sweet cake.


Coconut Lemon Slice


 HOW TO MAKE EASY COCONUT LEMON SLICE


This recipe employs the one bowl method, in that everything for the cake batter is mixed together in a single bowl, or in this case a large saucepan.


FOR THE CAKE:


  1. Preheat the oven to 350*F/180*C/ gas mark 4. Butter an 8-inch square baking tin and line with baking parchment.
  2. Melt the butter in a large saucepan and leave to cool to room temperature.
  3. Whisk in the milk, sugar, eggs and vanilla. Combine well.
  4. Whisk in the self-raising flour and the coconut, again combining well.
  5. Scrape with a spatula into the prepared pan and smooth over the top.
  6. Bake in the preheated oven for 40 to 45 minutes. The top will spring back when lightly touched and a toothpick inserted in the center should come out clean.
  7. Leave to cool in the tin for 10 minutes before removing to a wire rack to cool completely.


Coconut Lemon Slice  


FOR THE LEMON BUTTERCREAM FROSTING:


  1. To make the frosting, beat the butter, icing sugar together with just enough lemon juice to give you a thick spreadable frosting. Swirl this on top of the cake and dust with the lemon zest.
  2. Leave to set before cutting into slices to serve.
  3. Store any leftovers in an airtight container.


Coconut Lemon Slice 


This is a beautiful cake slice that goes together very easily and is fabulous served, cut into squares or rectangles alongside a hot beverage.


It also makes a delicious dessert cut into squares and served with a scoop of vanilla ice cream or lemon sherbet. 

 
Nobody ever turns down a slice!


Coconut Lemon Slice 


A FEW OTHER TEATIME BAKES YOU MIGHT ENJOY


GINGER CRUNCHIES -  These cookie delicious cookie squares are crisp and buttery, very short textured, almost like a shortbread cookie.  They are also topped with a lush ginger glaze and some sweet chunks of preserved ginger.  Don't worry if you haven't got any preserved ginger, you can substitute candied ginger for it or leave it off altogether. These are a fabulous addition to the teatime table.


BAKEWELL SLICES - A base of short-crust pasty is topped with jam and a moreish almond frangipane cake, topped with flaked almonds before baking to teatime perfection. A sweet almond glaze is flicked over top before being cut into slices to serve along with your favorite hot bevvie!


Coconut Lemon Slice  


Pin This Recipe to Your Dessert or Cake Boards on Pinterest and Remember to FOLLOW ME ON PINTEREST,    FACEBOOK, or INSTAGRAM


That way, you can be assured that you are always up to date with my fresh content as soon as I post it. You can also sign up to receive a weekly newsletter from Grow. 


Yield: 12 slices
Author: Marie Rayner
Coconut Lemon Slice

Coconut Lemon Slice

Prep time: 10 MinCook time: 44 MinTotal time: 54 Min

A moist and delicious coconut cake topped with a lush lemon buttercream frosting. Fabulous as a treat served with a hot cuppa, or as a dessert served with a scoop of vanilla ice cream or lemon sherbet. A one bowl make and bake.

Ingredients

For the cake:
  • 1 1/3 cups (150g) self-rising flour (see notes)
  • 1 1/2 cups (100g) shredded unsweetened coconut
  • 1/2 cup (115g) butter, melted
  • 3/4 cup (150g) sugar (in the U.K. use castor)
  • 2 large eggs, lightly beaten
  • 1/2 cup (120ml) whole milk
  • pinch salt
  • 2 tsp vanilla extract
For the lemon buttercream:
  • 1 1/2 cups (190g) sifted icing sugar
  • 1/3 cup (70g) butter, at room temperature
  • 2 to 3 TBS of fresh lemon juice
  • finely grated lemon zest to decorate

Instructions

  1. Preheat the oven to 350*F/180*C/ gas mark 4. Butter an 8-inch square baking tin and line with baking parchment.
  2. Melt the butter in a large saucepan and leave to cool to room temperature.
  3. Whisk in the milk, sugar, eggs and vanilla. Combine well.
  4. Whisk in the self-raising flour and the coconut, again combining well.
  5. Scrape with a spatula into the prepared pan and smooth over the top.
  6. Bake in the preheated oven for 40 to 45 minutes. The top will spring back when lightly touched and a toothpick inserted in the center should come out clean.
  7. Leave to cool in the tin for 10 minutes before removing to a wire rack to cool completely.
  8. To make the frosting, beat the butter, icing sugar together with just enough lemon juice to give you a thick spreadable frosting. Swirl this on top of the cake and dust with the lemon zest.
  9. Leave to set before cutting into slices to serve.
  10. Store any leftovers in an airtight container.

Notes

You can very easily make your own self-rising flour. For every cup of flour needed, whisk together 1 cup (125g) of flour with 1 1/2 tsp baking powder and 1/4 tsp of salt. I usually do this about 4 cups at a time and store in the cupboard to use as needed.

Did you make this recipe?
Tag @marierayner5530 on instagram and hashtag it #TheEnglishKitchen


Coconut Lemon Slice


This content, written and photography, is the sole property of The English Kitchen. Any reposting or misuse is not permitted. If you are reading this elsewhere, please know that it is stolen content and you may report it to me at mariealicejoan at aol dot com.


Thanks for visiting! Do come again!! 


 If you like what you see here, why not consider signing up for my newsletter and/or subscribing to/following me on Grow? You can also bookmark my recipes via the Grow platform. Check out the heart on the right-hand side of the screen.
IKEA Hackers ([syndicated profile] ikeahacker_feed) wrote2025-07-11 12:00 pm

Kiss Wasted Space Goodbye With This Low Ceiling Storage Hack

Posted by Stacy Randall

If you were hungry and someone gave you all the necessary ingredients to make a full-course meal, wouldn’t you start cooking? I feel the same way about organizing — if I see a chance to get extra storage, I’m taking it. That’s why I love this hack from Haus Auf Der Apfelwiese @haus_auf_der_apfelwiese. They have a sloped low ceiling, which we all know is often the sworn enemy of storage space. They tried to make it work with three IKEA […]

The post Kiss Wasted Space Goodbye With This Low Ceiling Storage Hack appeared first on IKEA Hackers.

The English Kitchen ([syndicated profile] theenglishkitchen_feed) wrote2025-07-11 06:00 am

Reuben Fold-Overs – A Hot Sandwich Bake You’ll Love


 I recently had some of my grandchildren come to visit with me on their way to summer camp. I was just thrilled to see them. They live in another province, so I don't really get to see them very often. When I lived in England, I didn't get to see them at all! Now that I am back in Canada, getting to see them in person a few times a year is a real BONUS!!!


We have spent the last few days just enjoying each other's company, playing games together, and eating some tasty food.  Nothing too complicated because, if you only see your grandchildren once or twice a year, you don't really want to spend the whole time in the kitchen slaving over a hot stove.


Quick and easy is the order of the day and preferred above anything else!


 Things like these delicious hot Reuben Fold-Over Sandwiches are perfect.  Not only are they quick and easy to make, but the grandkids can help to put them together as well. You can also customize them so that they can fill them with just what they like or don't like.  


Myself, I want the whole shebang, tangy sauerkraut, smoky pastrami, gooey cheese and creamy Thousand Island Dressing. Some of the grands only want the meat and cheese, no sauerkraut please, or sauce for that matter.  Others want only the cheese.  Some just want a hot dog.  You just have to laugh and give them a hug and celebrate the wonderful creature that they are! Grands are there to spoil when you can, and it's completely okay. 


With something as simple as this tasty sandwich, it doesn't matter one iota!! Not a lot of effort, very few ingredients, and not a lot of time or special equipment required. These are a WIN for everyone!


Reuben Foldovers  


WHAT YOU NEED TO MAKE REUBEN FOLD-OVERS


There is nothing too complicated in these sandwiches. Simple bread, simple filling, simply put together.


  • 6 smallish flat breads, folded in half (or 6 pita pockets)
  • 6 TBS Thousand Island Salad Dressing
  • 1 pound thinly sliced Pastrami
  • 6 heaped dessertspoons of sauerkraut, well drained
  • 6 slices Swiss Cheese
  • softened butter
  • parsley flakes


Reuben Foldovers  


The flat breads I used for these are about 6 to 8-inches long, and are quite pliable, which enables them to be folded in half without them breaking.  Likewise Pita Pockets should not be much larger than that.  Cut in half you should get two nicely sized pita pockets to stuff.


You can easily make your own Thousand Island dressing. I make my own using mayo (3/4 cup), tomato ketchup (3 TBS), 2 TBS sweet pickle relish, 1 TBS lemon juice (or white vinegar) and some seasoning. (I use seasoning salt.)  Easy peasy.


I used pastrami, but you could also use Montreal Smoked Meat, or corned beef. There is no need to heat it before adding it to the sandwich filling.


Use a good quality bagged or jarred sauerkraut and drain it well before adding it to the sandwich.


You can use any brand of Swiss Cheese. I used Jarlsberg which has a lovely flavor. Any good melting cheese would work, but a Swiss cheese is traditional in a Reuben type of sandwich.


HOW TO MAKE REUBEN FOLD-OVER SANDWICHES


These are simple to make.  Children often like to help make these, and with the exception of putting them into the oven and taking them out, they are quite safe to make.


  1. Preheat the oven to 180*C/350*F/ gas mark 4. Have ready a shallow baking dish large enough to hold all the flatbreads in one layer.
  2. Carefully fold the flatbreads in half, taking care that they don't split.
  3. Divide the sliced pastrami between the flatbreads, tucking it into the folds. Layer on the sauerkraut and cheese slices (folded in half diagonally). Drizzle on some Thousand Island dressing.
  4. Place the fold overs into the baking dish in a single layer. Brush the top of each with some softened butter and sprinkle with some parsley flakes. Cover the dish with some aluminum foil
  5. Bake in the preheated oven for 10 to 15 minutes, until everything is heated through and the cheese has melted. Serve hot.


Reuben Foldovers  


Notes

If you are using Pita Pocket breads, you might get away with using 3 medium sized pocket breads, cut in half across the middle. Just cut in half and open up the pockets. Stuff the pastrami inside along with the sauerkraut, cheese and a drizzle of Thousand Island dressing, dividing it equally amongst each pocket bread. Brush the outsides with the butter and proceed as above.


Reuben Foldovers  


HINTS AND TIPS FOR PERFECT HOT SANDWICHES


A few essential hints and tips to help you turn ANY hot sandwich into a delicious sandwich!


  • Bread is the most important part. Make sure you choose the right type of bread for the sandwich you want to make. Sturdier fillings require a sturdy, heartier bread to hold up to the filling without it falling apart. A light filling will work well in a much lighter bread.
  • Bread flavor is also an essential part.  Sourdough, pumpernickel, rye, brioche, seeded, whole wheat, white, pocket breads, etc. Choose a bread with a flavor that will highlight and mesh well with the filling you have chosen.
  • Make sure both the filling and the breads are hot when you go to serve them. There is nothing worse than a hot sandwich that is still cold in the middle. Any cheese added should be melted through. That is generally a good indicator of how hot the sandwich is in the center.
  • Fill any sandwich you make generously. Don't be chintzy with the filling. A sandwich worth eating is always filled amply and to the edge.
  • Layer everything in the right order. You will want to put anything which is sticky such as cheese on the top or bottom of the sandwich so that it can melt down through the other fillings and help to hold everything together.


Reuben Foldovers   


A FEW OTHER HOT SANDWICHES WHICH YOU MIGHT ENJOY


HOT HAM AND CHEESE BUNSFresh poppyseed Kaiser rolls brushed with a honey mustard butter and filled with plenty of deli ham, Swiss cheese, caramelized onions and crispy bacon! Amounts are for one sandwich but are easily multiplied to make as many as you have guests! These really are very easy to make. Probably the most time-consuming part is the caramelizing of the onions. If you are not keen you can always leave them out, but I highly recommend you do make them as they really add to the deliciousness of this tasty sandwich! 


SOUTH CAROLINA BIRD DOG SANDWICHESThis delicious sandwich is the perfect marriage of bacon, chicken tenders, cheese and honey mustard.  Or, as I have also seen it described, the perfect option for those who don't like hot dogs! I can't imagine not liking hotdogs myself, but it takes all kinds! The original sandwich comes from a restaurant in Anderson, South Carolina called Daddy Rabbitt's over 25 years ago. That original diner is no longer in operation, but the sandwich lives on!


HOT ITALIAN HOAGIESI wish I could tell you how many times I have made these delicious hot sandwiches.  They were something I used to make for the Missionaries when they would come for supper in the U.K. A little taste of home. They are quick and very simple to make. As easy as layering simple ingredients into split fresh buns and baking in the oven.  The sub buns are spread with a parmesan garlic butter before laying with a selection of Italian Cold Cuts, spicy pickles and some cheese.  Baked in the oven until everything is heated through and the cheese all melty, nothing goes down better!  These are quite simply fabulous!


Yield: 6 sandwiches
Author: Marie Rayner
Reuben Fold-Overs

Reuben Fold-Overs

Prep time: 10 MinCook time: 15 MinTotal time: 25 Min

Pastrami, sauerkraut, Swiss cheese and Thousand Island Dressing all tucked into a tasty Folded Flat Bread.  Quick, easy, delicious. If you can't get the smaller flatbreads, feel free to use Pita Pocket breads. What's not to love!

Ingredients

  • 6 smallish flat breads, folded in half (or 6 pita pockets)
  • 6 TBS Thousand Island Salad Dressing
  • 1 pound thinly sliced Pastrami
  • 6 heaped dessertspoons of sauerkraut, well drained
  • 6 slices Swiss Cheese
  • softened butter
  • parsley flakes

Instructions

  1. Preheat the oven to 180*C/350*F/ gas mark 4. Have ready a shallow baking dish large enough to hold all the flatbreads in one layer.
  2. Carefully fold the flatbreads in half, taking care that they don't split.
  3. Divide the sliced pastrami between the flatbreads, tucking it into the folds. Layer on the sauerkraut and cheese slices (folded in half diagonally). Drizzle on some Thousand Island dressing.
  4. Place the foldovers into the baking dish in a single layer. Brush the top of each with some softened butter and sprinkle with some parsley flakes. Cover the dish with some aluminium foil
  5. Bake in the preheated oven for 10 to 15 minutes, until everything is heated through and the cheese has melted. Serve hot.

Notes

If you are using Pita Pocket breads, you might get away with using 3 medium sized pocket breads, cut in half across the middle. Just cut in half and open up the pockets. Stuff the pastrami inside along with the sauerkraut, cheese and a drizzle of Thousand Island dressing, dividing it equally amongst each pocket bread. Brush the outsides with the butter and proceed as above.

Did you make this recipe?
Tag @marierayner5530 on instagram and hashtag it #TheEnglishKitchen


Reuben Foldovers


Now THATS what I call a tasty mouthful!


This content, written and photography, is the sole property of The English Kitchen. Any reposting or misuse is not permitted. If you are reading this elsewhere, please know that it is stolen content and you may report it to me at mariealicejoan at aol dot com.


Thanks for visiting! Do come again!! 


 If you like what you see here, why not consider signing up for my newsletter and/or subscribing to/following me on Grow? You can also bookmark my recipes via the Grow platform. Check out the heart on the right-hand side of the screen.
IKEA Hackers ([syndicated profile] ikeahacker_feed) wrote2025-07-10 12:00 pm

IKEA’s Newest BILLY Is Built for Small Spaces—And It’s Brilliant

Posted by Jules Yap

File this under “finally.” The IKEA BILLY bookcase just got a fold-out desk, and the world’s most popular bookshelf is now a multitasking wonder. Meet the latest addition to the BILLY family: the BILLY Bookcase with foldable table. It’s smart, streamlined, and maybe the most exciting thing to happen to bookshelves since color-coded spines. IKEA has finally given its most iconic bookcase a literal flip side—and for anyone living small, or just trying to squeeze more function into their space, […]

The post IKEA’s Newest BILLY Is Built for Small Spaces—And It’s Brilliant appeared first on IKEA Hackers.